
Adrian Tippins lists the factors you need to consider when it comes to getting the best vane-to-shaft bond possible. This is part of a series of posts, for part 1 of this series click here.
Successful fletching requires the knowledge of how glues work. Broadly speaking, adhesives can be split into two categories
Now that we have fully prepared shafts as detailed in my previous three articles, it’s time to turn our attention to what most people believe is the hardest part of arrow building. This is practical fletching, the process of attaching your chosen feathers, vanes or wings to the arrow. In this part we’re going to be focusing on plastic vanes. Getting a good bond between the vane and the arrow is not as easy as people often think. This is down to the fact that there are three main factors to consider. I think of this as the triangle for success, and success is dependent on each point being compatible with each other. These factors are 1) Shaft surface, 2) Vane, and 3) Adhesive.
It’s really important to do a test arrow with a spare wrap and vane before rushing into doing the full set of arrows for real. This test will show up any compatibility issues between the three elements and give you a chance to effect any changes. Fletch an arrow and wait 48 hours for the glue to fully cure. Test the arrow by trying to pull the vanes off. You should not be able to pull them off by hand and they should need considerable force from a set of pliers to be removed, taking the wrap with it if you have used one.
Fletchings need less glue than you might think, but if you over-estimate it a quick wipe will clear off any excess
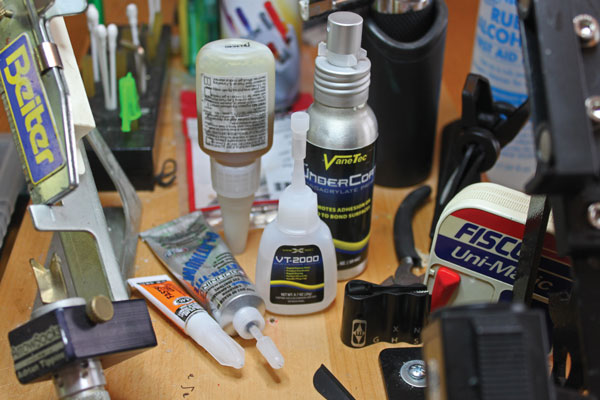
There isn’t one miracle glue for all applications and combinations. Anyone that tells you there is, is just plain wrong. Different vane and surface combinations will like different glues, so successful fletching requires the knowledge of how glues work. Broadly speaking, adhesives can be split into two categories depending on their chemical composition. Firstly, there’s Methyl Ethyl Ketone (MEK) solvents such as Bohning Fletchtite and Saunders NPV. These glues require little clamp pressure and, used in the right situation, MEK adhesives give a flexible and waterproof bond that can actually increase over time.
The downside is they are messy to use and need long curing times. Secondly, there are Cyanoacrylate (CA) liquids and high viscous gels such as AAE Fastset. These are often referred to as “Super Glues”. These are pressure sensitive and won’t stick unless the two surfaces come together with considerable pressure. They can allow for precise and accurate application, and they also reduce fletching clamp time down to five seconds a vane, but CA adhesives can sometimes go brittle in the long term. Accelerator/primer sprays are available for this type of glue to assist in problematic applications such as fletching directly onto aluminium or carbon shafts.
Like everything else, the feet of each vane should be cleaned thoroughly with 100 per cent acetone or IPA. Manufacturers often coat vane material with a slippery agent to ensure the cut vanes release from the mould. This drastically reduces bond strength if it isn’t cleaned away. That said, some manufacturers like AAE coat the feet of their vanes with a chemical accelerator that works with their own brand of glue, but not others. In this instance, if non-AAE glue is to be used, the feet should also be cleaned to remove the coating. Cleaning vanes with solvents is also said to open the pores of the material which will increase the bond. It’s important to use 100 per cent pure solvents for cleaning, as solvents that aren’t pure may well leave the impurities behind, thus affecting the bond.

If using a cyanoacrylate glue, place a line of dots down the centre of the vane and then apply to the shaft
Vane materials differ from brand to brand, and in some cases they can differ from model to model within a brand. Some vanes are made of a silicon-based material, some are urethane, and some are composites which contain substances like microscopic glass beads for durability. The width and profile of the foot also differs vane to vane. This gives different amounts of surface area to produce a bond, and also affects how the vane will either hold the glue or want to squeeze it out when pressure is applied. Last but certainly not least, the quality of the fletching will depend on the skill and patience of the person carrying out the work and the quality of the tooling. Precision and perfection can never be rushed, and producing pristine, long-lasting arrows takes time and effort.
When you’re ready to start, the first job is to rotate and index the nocks in the desired position so that your vanes will be placed in a predetermined place when the shaft is in the starting position in the jig. This position is usually determined by the need to align vanes with graphics or to avoid them. It can also be determined by wishing to have the index vane on a particular side of the shaft after spine testing. Vanes will also need careful placement in the clamp to ensure they are correctly placed and spaced on the arrow. Generally speaking, the back of the vane should be placed approximately one and a quarter inches from the groove of the nock. You will need to mark the correct position of the vane on the clamp to achieve this prior to starting as the nock may well be hidden in the receiver when it’s in the jig, making measuring impossible.
A great tip for super accurate fletching spacing is to find a nock that fits really snugly into the receiver of your jig – you don’t have to fletch the arrows with the nocks that the finished arrows will carry. It’s common to find that some nocks rattle around in the receiver, giving some lateral movement. This can cause vanes to be well out of alignment, especially on a thin diameter arrow. I have found that in general, small groove G or Pin nocks fit more snugly than their large groove counterparts, but the fit will vary depending on what jig you have.
The main mistake most people make when fletching is to use way too much glue. A vane is a tiny, lightweight object with a small footprint and needs far less glue than you might first think. The trick if using CA glues is to place tiny beads of glue right down the centre line of the vane foot, ensuring equidistant spacing. If you’re going to weight match the set, take note of the number of beads (normally a 1.75-inch vane will have around 15 small beads). Ensure all vanes carry the same amount of beads. Bring the clamp down on the arrow with just enough pressure to squeeze the beads together, ensuring total coverage but not squeezing the glue beyond the vane’s foot. Having to clean off excess glue will make for a shabby looking arrow and may well result in dissolving the print on wraps.
Different glues can react differently depending on the vane material, so there’s an advantage to making up a test arrow first
Have some cotton buds at hand to quickly and neatly wipe away any excess glue should it appear. A pro tip when using MEK adhesives is to have some sturdy paper towels at hand. Place a thin line of adhesive down the centre line and lightly dab the glued vane foot on the paper towel to blot it before attaching it to the arrow. This process should ensure that the foot is fully coated but the excess has been taken off. When attaching the vane, remember that MEK adhesives don’t require pressure. The glue is there to fuse the surfaces together. The process of attaching a vane with an MEK adhesive has to be brisk as it dries very quickly on contact with air. After a few minutes, gently remove the clamp and rotate the jig receiver through 120 degrees ready for the second vane. When attaching the second vane, pay particular attention to its relationship with the first and ensure that it’s 100 per cent aligned. The same goes for the third vane.
It may sound strange, but vanes of the supposedly same length can differ. This is highlighted when you perform the clamp alignment, so do check. If you come across a longer vane you can trim it to length with a sharp knife. Unfortunately there’s nothing you can do about a vane that’s abnormally small except place it as best as you can, or use another, more regular length vane if you have spares.
When complete, remove the arrow from the jig and inspect the indexing of the nock. If the tooling used is accurate and everything has gone well the nock and vanes should have perfect orientation. If not, make an adjustment with the correct nock insertion tool. Arrows should be left to fully cure for 48 hours, preferably upright in a rack. Once cured, inspect the seating of every vane by giving it a gentle flex from side to side. This should reveal any gaps in the adhesion which can be solved by placing a small amount of adhesive on the tip of a needle and feeding it underneath the vane foot.
Find Part 2 of Adrian Tippins’ series here
This article originally appeared in the issue 119 of Bow International magazine. For more great content like this, subscribe today at our secure online store www.myfavouritemagazines.co.uk