
Duncan Busby made the switch to a back tension release aid, and here he explains how to make the process work for you

Photo: Dubravko Buden
A couple of years ago I set myself the goal of shooting with a back tension release for the entire season, as I needed to iron out a few kinks in my technique. Over the months, my confidence in this release aid grew and my form is now smoother and more consistent. It took some mental strength to stick with it at times, especially when it was windy, but I’m glad I did; I continued to shoot with it indoors and I hope to encourage other archers to make the switch too…
The science
 The advantage of using a back tension release is that, logically enough, it encourages the archer to use back tension in their shot process; this is considered to be the most accurate and consistent way to shoot a compound bow, regardless of the release aid you choose. Back tension uses a very specific set of muscles and though it isn’t essential that you’re able to identify each one, it can be helpful to understand their role in the process. When drawing your bow you will be engaging your trapezius muscle in the upper back, rather than your shoulder, bicep or forearm muscles; these remain as relaxed as possible so that the back muscles can be used correctly. Then, while aiming, you ‘pull through’ the shot using your rhomboid muscles. These are deep layer muscles that are attached to the scapula. Once they begin compressing they cause the scapula to move, which in turn causes your elbow and draw hand to move back. Finally, upon execution of the shot, the latissimus dorsi muscle is compressed in a descending motion, which pulls your elbow downwards on follow through.
It can be hard to identify whether you are actually engaging these muscles or not, but an easy way to feel them is to stand with both arms out at your side so you make a T-shape, then bend your draw arm so that the palm of your hand is resting on your chest with your fingers on your sternum, then gently slide your draw hand back towards your shoulder keeping your elbow out at 90 degrees; the muscle tightness you should be feeling in your back are the same muscles that should be tightening upon release.
I personally think ‘pull through’ would be a better term for this technique, since you can easily tense your muscles up without creating the correct movement to execute the shot. Back tension also implies a tense stance, and that it is exactly what we are trying to avoid!
Though back tension release aids are recommended for archers suffering from target panic or form problems, not everyone who uses one will use back tension as a technique. Some prefer instead to use their arm, wrist or fingers to activate their release.This is not necessarily wrong, but it does mean that you are not engaging your back muscles correctly nor creating a surprise shot, which could lead to problems in the future. Any style of release aid can be used to engage the correct muscles, but it should be easier to learn and maintain this bio-mechanical process with a back tension release aid.
The release aids
When I talk about a back tension release, I’m actually referring to two different forms of release aid: the hinge and the resistance release, both of which are activated by increasing the pressure in your shot but they each use slightly different firing mechanisms.

A resistance type of back-tension release activates when a certain pressure is reached, like the Carter Evolution
A hinge is activated by the rotation of the release handle; the twisting movement pulls the hook, which is attached to your d-loop, off a half-moon shaped sear triggering the release. The speed of this release action is altered by adjusting the angle and position of the half moon. Some models also feature a safety catch which will ensure that the release cannot fire while you are drawing it.
A resistance release is triggered once it reaches its activation weight; this is usually set at a few pounds above your bow’s holding weight, so it is important that the safety catch is engaged while you draw your bow. The activation weight is altered using the springs inside the mechanism and only once the safety catch has been disengaged, and the set pressure has been reached, will the release fire.
Both of these designs should help you to execute your shots using the right muscles and
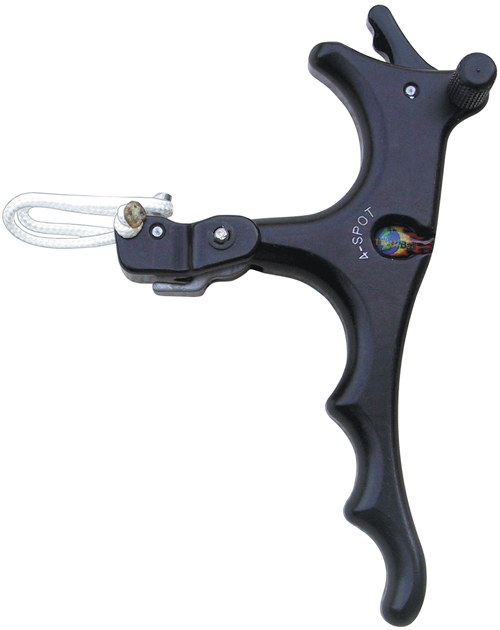
Some release aids like the TRUBall Sweet Spot come with a safety catch to stop the release from firing during the draw
technique, but how do you put all this together and use a back tension release effectively?
The technique
Back tensions often get overlooked in favour of trigger releases, and bad experiences or poor advice can often put archers off using them. Most back tensions come with safety catches which will stop any accidents from happening when you draw your bow, and proper use and a clear understanding of how to set these release aids should ensure that your experience with a back tension release is a positive one. Before you shoot any release aid for the first time it is important you check how sensitively it is set, as an overly-sensitive trigger release is just as likely to misfire if you are not used to it. I would recommend testing the release with a long piece of d-loop material before using it to draw your bow; set it a little heavy to start with, as you can always speed it up later.
Once you are happy with the activation speed you will need to learn how to execute a perfect shot. I would always recommend doing this close up on a blank boss. Stand in your usual shooting position and making sure you have engaged any safety mechanism your release may have, carefully draw your bow and find your anchor point. Once you are comfortable, release the safety and concentrate on smoothly increasing the pressure on the cam wall using your back muscles. The easiest way to do this is to pull as if you were trying to draw an extra inch or so. Keep your front arm solid and gently push against your draw arm; this should be relaxed and the pressure balanced so your aim is steady and your release smooth. You will find that if you push too much with your front arm your dot will bounce around the target, whereas if you are pulling hard with little or no resistance from your front arm your shot will be weak and will take a long time to go off.
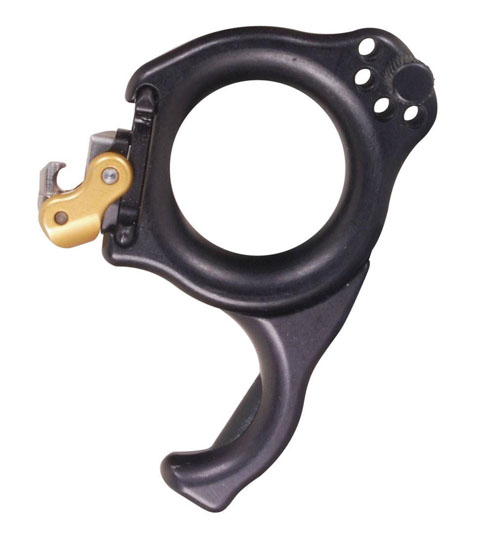
A hinge release, like the TRUBall Inside Out, uses back tension and rotation to pull a hook off a sear, activating the release
You should attempt to use your back as much as possible to achieve this pressure. This can be easier said than done, but you will find that your back muscles are more stable than those in your arm and shoulder because they’re short, strong, and positioned closer to the spine, so they can make the most use of your skeleton for support.
Besides adding stability, back tension will also prevent the collapse of your form; if you relax your draw arm and concentrate on pulling through the shot with your back you shouldn’t creep forward prior to release, and this will make the whole process much more consistent.
Keep practicing this ‘pull-through’ technique on a blank boss until every shot flows smoothly. If you find the release is going off too quickly or too slowly, alter the timing until it activates in a fast but manageable time frame. I usually set mine a little fast on the blank boss as I find the aiming process adds some time to my shot routine. Once you are comfortable, start using a target face. Maintain your concentration while aiming and remain at a fairly close distance until you are comfortable with the shot process. Once your confidence has increased, start moving the target back but don’t rush it; you are learning a new technique and you must allow yourself time for the process to become natural and consistent, as with any change it can take a bit of time for your scores to level out and rushing any learning process may impact on your confidence; it can take up to 28 days for something to become a habit.
The results you get initially may be quite mixed; you may find that your good shots are better than ever but your bad shots hit further out than expected and your release timing is a little random, but don’t give up. There is no such thing as instant success, and those of you who persevere will start to experience the advantages of shooting with back tension for yourselves. Looking back over my own results I’ve found that not only have my scores increased, but I’ve been able to repeatedly hit them as well.
With enough time, effort, and patience, you should find a back tension release is just as reliable as your trigger; it will encourage you to keep your form strong and to pull consistently and smoothly, you just need a bit of faith to take that initial leap.
Remember you don’t ‘try’ a back tension release to see if you like it, you commit to it for the long term, but in taking it up you will be joining some of the best compound shots in the world.

After committing to a back tension release Duncan found his form becoming smoother and more consistent
Photo: Dubravko Buden
I noticed your release fingers are parallel to floor when drawing instead of draw hand angled, thumb pointed toward floor, what is the difference. Do you draw with a relaxed bowarm or rigid, also do you push alot at full draw. Also at full draw do you relax index finger to let the other two fingers take over, I’m using a Scot Backspin with clicker. I’m kinda new at it and would appreciate any help you have to offer. thanks Duncan
Your image of the back muscles is incorrectly labeled. The infraspinatus muscle is labeled rhomboids. Actually, the rhomboids are medial to the scapu between it and the spine.
You’re an extremely valuable website; couldn’t make it without ya!
http://test2.com