
When it comes to getting comfortable with your bow, John Dudley advises starting with your measurements
One of the most important parts of archery is having a perfect draw length. It should be something you know, something you set on your bow and then leave alone. However, adjusting the draw length of the bow is one of the most common changes people continually make on their bows. I have known guys that have changed draw lengths nearly every month throughout a full season simply because they can never feel comfortable. It’s my experience that finding comfort will come from two things. First, it will be the ‘knowing’ of what your draw length is and having the confidence that it is where it needs to be. That alone will eliminate you second-guessing yourself and being tempted to adjust it again. The second is the physical comfort of eliminating neck, elbow or shoulder pain due to improper alignment. Having the correct draw length lines up the skeletal structure and allows for your bones, instead of the muscles, to support your shot. Having a solid draw length will mean you have a solid foundation and a solid structure. This article is going to tell you how to make sure you are measuring up to be your best.
What to look for
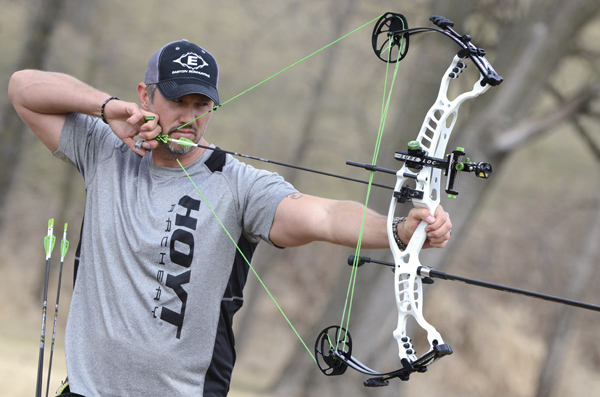
If your draw length is set correctly then you should be able to have a perfect shooting posture. Whenever I am looking at a person’s form I look for several key things. First off I look for a posture that resembles the shape of a “T”. This will mean that their feet are directly under their hips; their hips are directly under their shoulders; and their arms are in a horizontal line when at full draw. This will form a perfect T-shape through the bone structure of the front arm and shoulder socket. The pelvis, torso and spine should also be in alignment with this posture as well. The head should be in an erect and vertical position, with the string just touching the tip of the nose. The string should come to rest just past the corner of the mouth, allowing the string to lie on the outside corner of the lip.
When it comes to string positioning on the face, you also need to consider the bow you are shooting. This is relative to having the correct draw length for several reasons. Bow-making companies have lots of models to choose from. They have bows with a wide variety of axle-to-axle lengths and brace heights, which are the two things that affect the bow’s string angle. They do this for a reason! I am here to tell you that not all bows fit all people the same. This is why I think that people can get caught up in readjusting their draw length even when their posture is correct. If the string angle isn’t fitting their face correctly it simply doesn’t feel right. For taller people, like me, you are going to struggle with shooting shorter axle bows with shorter brace heights because of the fact that the angle of the string is too severe at full draw. If the string angle is sharp then it can cause you to have your head tilted too far forward to be able to get the tip of your nose to the string. Likewise, if you are shorter, then you will feel uncomfortable with a really long bow with a large brace height because the string angle will be bigger. Top quality bows will come in a variety of configurations so that you can find the right fit. For example, take the Hoyt Pro Comp Elite, which is available in three sizes, the regular for the mid-range draw, the FX for shorter draws, and the XL for taller shooters that need a bigger string angle.

These dots show proper alignment obtained from a perfect draw length
How to measure up
Now that you know the fit you are looking for I want to talk about how to measure for the actual draw length. What I do when measuring someone’s initial draw length is to have them stand in front of a wall with the proper alignment of the basic T-formation. Again, this will mean their feet are directly under their hips, and their hips are directly under their shoulders. The front bow arm is then raised up and I have the person make a fist without compressing the shoulder or bending the elbow. Simply raising the arm and making a fist is perfect. I then have the person move to the wall so that the front of the fist is touching the wall. Again, it is important to make sure that the person is not leaning one way or the other, and also I make sure the front bow arm is in the same position as when shooting. The arm should be level and the front elbow should be “soft” but not hyper-extended or bent. I then have the person look towards the wall and I measure the distance from the wall to the corner of the mouth. For the vast majority of people this is a foolproof way of getting the right draw length. If you would like to see a You Tube video I did on this technique, you can check it out at: www.youtube.com/watch?v=oG0nb01SGMA
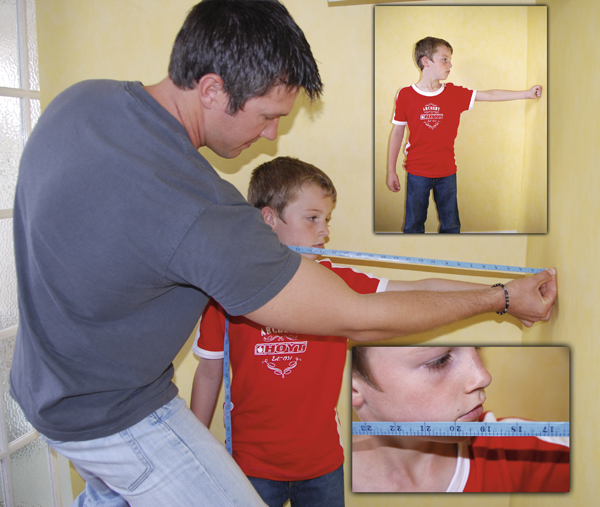
A closed fist to the wall with a T-alignment is an excellent draw length reference
The reason behind making a fist and then touching the front of the fist to the wall is because of how draw length is measured. AMO standard draw length is measured 1¾” in front of the pivot point of the bow to the centre of the string at full draw. Since most people’s fist is comparable in distance from where a bow handle will sit in the palm to the front of the knuckles to the 1¾” that AMO uses, it works perfectly. This is a very quick and easy way to measure someone’s draw length in any location. There are also other ways of measuring draw length, and I have seen a wide variety of tactics. However, this one is something that doesn’t require formulae or calculations. This one helps put the string in the correct position on the face, which is also critical to proper arrow clearance. If you need to fine-tune your draw length so that your anchor position is where you like it with your release, then this easily done with a D-loop.
Common form flaws
Several months back I wrote a series of articles about back tension and draw cycle and how to use it. In that series I talked about the importance of the front shoulder and the positioning of it in relation to using back tension. Having the correct draw length is going to be vital in making sure you are able to do that. If your bow is set too short then you are not going to be able to have the front shoulder forward and away from the spine – it will be compressed. If the shoulder is compressed then you will find it near to impossible to activate a release by pulling with the rear shoulder.
In that series I also talked about how it was important to realise that pulling with the back half of the body is more important than sitting perfectly still in the front half. Be aware of this if you are worrying about how still your aiming dot sits on the target. Many archers fall victim to wanting the bow to aim perfectly solid. Many times the best way to make a bow hold at its steadiest is to shorten the draw length so that the front half of the body is compressed and locked into position. For nearly all archers this is a dangerous road because you will be forced to manually fire your trigger from finger or hand movement, rather than building pressure from correct back tension. Don’t shorten your draw in the hope of steadying your hold. Compressing the front shoulder on the spine will certainly lead to bigger problems and even neck or shoulder issues.
I have had times in my career when I made the mistake of taking advice to shorten my draw length so that my pin held steadier on the target. Yes, by shortening it I will say my pin held steadier, however, I paid the price in learning the art of punching a trigger, and also had to learn to live with neck and shoulder pain because of improper alignment. If you suffer from front shoulder pain and neck tensions then chances are that you are too short in the draw, and the discomfort you are feeling is from compression. If you lengthen out to a correct draw, as I did, that pain will quickly go away. You may not be as steady at first, but as you build strength that will improve. I can also assure you that being able to pull through the shot is much more important than holding perfectly still.
Sometimes an archer’s form can have good positioning in the shoulders, but then be out of line when it comes to their head position. Remember, when your draw length is set correctly then the head should be in an erect and vertical position. Don’t take your head forward to the string, or have it tilted down. Your head while shooting should look no different than if you were to simply look over to your left side. Also, be aware that the peep height needs to be set correctly for this to happen. I have seen cases when the draw length of a shooter was fine, but they had the peep set too low which forced them to tilt into the string. Keep yourself tall and simply look towards the direction of the target. Adjust the peep so that it is level with the eye and sight pin while keeping that position.
The last common flaw is release length and loop length, which I mentioned earlier. If you are shooting a wrist strap release that is too long, or a loop that is too long, then it will cause you to be over-drawn, even though the draw length of the bow is set correctly. Set your strap or loop so that your anchor point is in the correct placement and preventing you from drawing too far. As a rule of thumb, the knuckles of a strap shooter will be somewhere in line with the ear, whereas a handheld release shooter will have the knuckles in front of the ear.
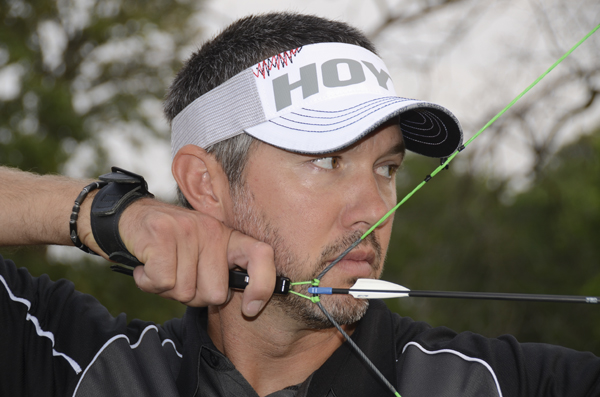
The strap length needs to be adjusted so that the knuckle of the index finger is at the base of the ear
Wrapping it all up
I want to make sure I note that most quality archery shops are going to be the best option for fitting you correctly. It is, however, important for you to understand that draw length is one of the most critical parts to having a good shooting bow. Take a minute and measure yourself like I described earlier. You may find that most of the problems you have been having in your shooting are because you were over- or under-drawn. Make sure you know what kind of string angle you need for your size before making your next purchase on a new bow.
In my coaching experience I’ve found women and juniors need to take draw length very seriously, and not just shoot whatever bow they are given. Proper fit is critical to not only proper form, but also the enjoyment of archery. If you are like me and want your family involved with archery then make sure they are fitted out properly and shooting gear for their size. Otherwise archery won’t be any fun. I look at it like this; I wouldn’t feel comfortable shooting my wife’s bow all day, so why would she ever be happy shooting one of my old ones? Handing down your old bow is only the right choice when the recipient is your size! Remember that archery parents – there are lots of great options for bows that are easily adjustable and grow with your kids.
Be smart about draw length, because is it extremely important and can help you be the best you can. Having your alignment at its best will mean you will have your scores at their best as well. Seek help from a good shop to get your draw set perfectly, and you will be much happier shooting. Have you ever noticed how a good archer looks so comfortable they are shooting? A lot of this is related to proper fit. Good shots come a lot easier when you are set up correctly. Next time I visit the UK I hope to see a long row of archers on the shooting line all measured up perfectly. Shoot well my friends!
John Dudley
Great article!! Easy to understand.
Thank you for posting your article it was very insightful , much appreciated ,regards Eric