
The third instalment in his series on building the perfect set of arrows, Adrian Tippins looks at wraps, and explains how to get the right type, size and application.
Follow Adrian’s advice to create your very own custom made set of arrows
Check out the first instalment of our How to Build an Arrow series: How to prepare your shaft and Part 2: Points and Pins
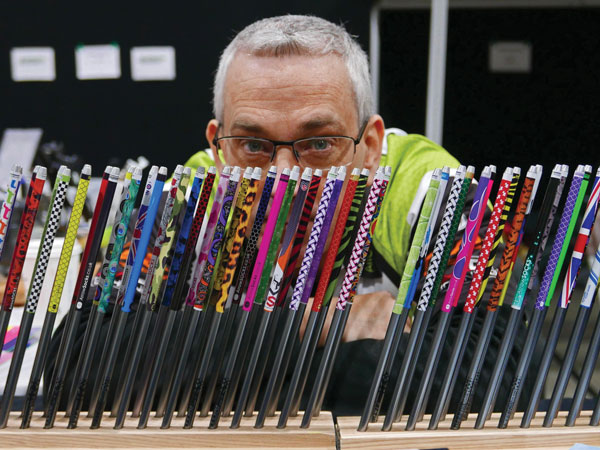
Our arrow is now starting to take shape and we can turn our eye towards adding some cosmetic sparkle as well as making our life a lot easier when it comes to practical fletching. It’s common practice nowadays to install a wrap prior to fletching. The main purpose of a wrap is to provide a plastic surface to stick a plastic vane to. A plastic to plastic bond is a lot stronger than attempting to bond directly to the shaft. The wrap will also make the arrow more visually pleasing, and can carry the identification details of the archer and other handy markings like spin vane lines. Wraps are widely available from both retailers and specialist manufacturers such as ArrowSocks. When purchasing from a specialist, you will have the opportunity to have wraps custom cut for your particular model and spine of arrow. This is advantageous if you’re thinking of having spin vane lines printed on them as the spacing will most certainly be correct if the wrap is a precise fit. Some manufacturers make wraps in just three or so sizes. With these, it’s important to know what size you might need.
Fortunately, there’s two really easy ways of measuring your arrows to determine the wrap size. The most accurate method is to measure the arrow with a set of digital or manual Vernier calipers. You will simply be able to read off the measurement. A more crude but still effective method of sizing an arrow up for a wrap is to use the paper method. Get a piece of paper that is approximately three inches long and one inch wide. Wrap the small end around the arrow and mark the paper exactly where it joins up. This is the measurement of the circumference of your arrow. Next, add 2mm on further to your join mark. This will provide the distance that your wrap will overlap for bonding. Finally, measure the total width of the paper used to the second mark. This is the width that your wraps need to be. You can use this information to consult manufacturer’s specifications or communicate the width directly to the person producing the wrap products.
Wrap installation can be a bit fiddly, but you’ll soon get the hang of it with a bit of practice. There are, however, some golden rules to remember when working with wraps. Firstly, try not to touch the adhesive side with your fingers. Secondly, ensure that shafts have been cleaned and prepared before attempting to fit any wraps as manufacturing and cutting dust could severely limit the wrap’s adhesive properties.
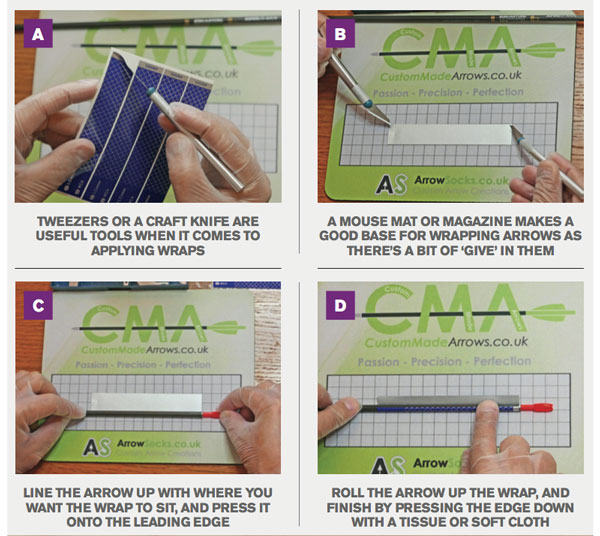
Wraps are very thin and fragile. Be careful never to overly pull on them as they are also easily stretched. Wraps tend to behave a bit better if they are refrigerated 30 minutes prior to use – this should limit their natural desire to curl when removed from the backing paper. You don’t need any specialist tools for wrap installation, but a pair of tweezers and a craft knife or scalpel come in very handy when picking wraps off of the backing paper. Both are also really good for positioning tiny items such as self adhesive initials or numerals.
Be aware that wraps can differ greatly. With some wraps the colour is in the actual vinyl fabric, while others may be a white vinyl that has been fully printed over to produce the cosmetic result. It’s more difficult to get vanes to stick to a fully printed wrap than one that is just coloured vinyl, and this is due to the fact that the fletching is being fused to a layer of ink rather than directly to the vinyl of the wrap. Inks can stop adhesives from getting through to the real fabric of the wrap and securing the vane. In my experience I have found that even different colours of ink produce different levels of bond, as some colours have a chemical incompatibility with certain adhesives.
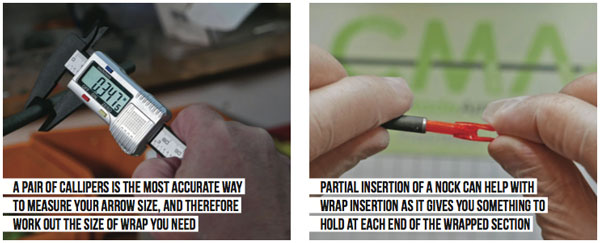
A handy tip to avoid touching the arrow and make for easier handling is to have a nock or pin adapter partially or fully inserted into the arrow which will give you something to hold onto, and will also give a visual indicator of which end is which. Orientation mistakes are very common when installing wraps. If using a nock to hold on to, use a small one and be prepared to extract it if it gets in the way or makes rolling difficult or uneven. Do make sure that you apply the wraps in a clean, dust-free environment as the wraps will be sticky side up for a while, with static attracting particles. Most people tend to fit wraps right up to the rear end of the shaft where it meets with the nock bush or pin adapter. There’s nothing wrong in doing this and it looks cosmetically perfect, but some archers like to leave a small gap between the end of the wrap and the nock end of the shaft so that they can easily see if the shaft picks up a crack or other damage that could be hidden by a wrap. It’s a personal choice.
Start the installation process by carefully peeling a wrap away from the backing paper using a sharp blade. Turn the wrap over and lay it adhesive side up on a smooth surface that has a small amount of give, such as a magazine or mouse mat. Rolling on graph paper can give you a good visual indication of alignment and the relationship between wrap and arrow shaft. Placing the wrap in position can be a little tricky as wraps have a fair amount of static cling. The front of the wrap should be on your left and the rear to your right.
Next, line up the arrow with the wrap as close as you can possibly get but not actually touching it with the nock end on the right hand side. Have a good look at the relationship between the rear of the wrap and rear of the arrow to ensure they are aligned. If everything is well aligned, roll the arrow upwards and onto the wrap. Roll half way and check that the first edge has gone on flat and is well seated. If it has, roll the rest of the way and press the seam down using a tissue or soft cloth and ensure that any air bubbles are dispersed. If it hasn’t, secure the first edge by pressing down with a tissue and then roll the rest of the way and ensure the seam is secured. Make sure that you don’t rub seams too hard if they are being troublesome, as pressure and friction might have an adverse effect on any printed design on the wrap. Problem seams can always be dealt with by placing tiny spots of glue on the end of a needle and coating the underside of the overlap.
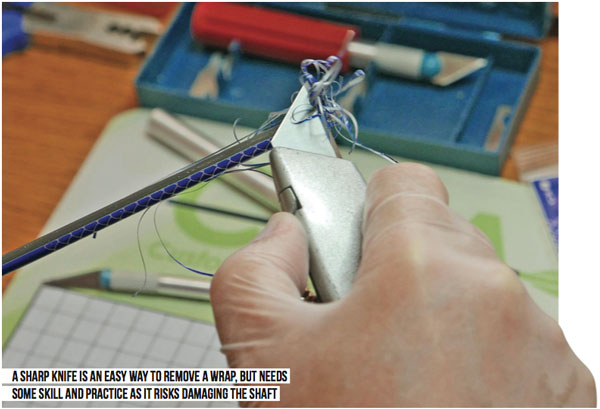
We’ve now looked at how to install wraps, but what about removing them? There are a few methods to remove unwanted wraps, though some are more safe than others. Personally, I shave wraps off with a very sharp blade. I find this method really quick and easy, but it requires skill, practice, and a good feel to avoid cutting into what could be an expensive shaft. Another, safer, way is to soak the wrapped shafts in boiling water for a while to soften the wrap and the adhesive so the seams can be pulled apart and the wrap pulled off. I have also heard of people softening the wraps with a hair dryer prior to removing them. One thing is for sure, never use direct heat as you will almost certainly damage the shaft, and possibly yourself! Whatever method you choose, you can easily get rid of any residual adhesive with a cloth and some acetone. Now your shafts are prepared and wrapped, in the next issue we’ll be looking at practical fletching.
This article originally appeared in the issue 118 of Bow International magazine. For more great content like this, subscribe today at our secure online store www.myfavouritemagazines.co.uk