
Bart Czuwara considers the application of symmetry and balance to traditional archery.
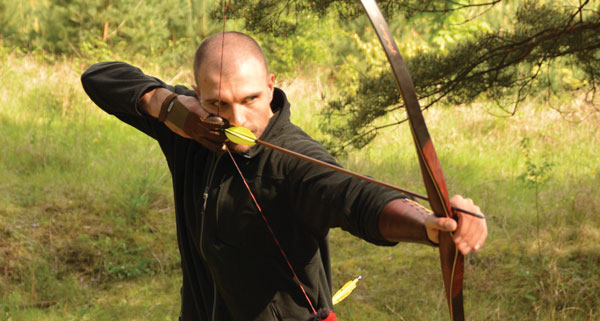
The beauty of symmetry! The two things that form the foundation of all archery techniques are symmetry (that is, balance) and comfort
Volumes have been written on the subject of archery form. Many great archers and archery coaches have tackled the issue of what proper archery technique consists of: good stance, strong bow arm, smooth draw, solid anchor and follow-through. However, when it comes to describing all those individual elements and how they should be performed, opinions vary so much that even seasoned archers sometimes lose their bearings. This variety comes from two things.
Firstly, today we shoot several different types of bows: English warbow, American flatbow, hunter recurve, Asian short recurve, Japanese Kyudo, and the latest developments being the Olympic recurve and compound bows. They are all bows but because their geometry, dimensions and poundages vary they all require slightly different techniques. For example, a trad bow, shot without sights, will often be held canted, while an Olympic recurve or a compound with sights must be held vertically. It is absolutely necessary to apply the push-pull draw (where you push the bow hand out and draw at the same time) when shooting an English warbow because it is the only way you’ll ever come to full draw on a bow of over 100lbs draw weight. In contrast, there must be no push on the bow when drawing an Olympic recurve, or a flatbow, as it will cause the archer to lose alignment.
Secondly, just like the bows we shoot, we too differ in size and proportions. Our height, arm length, general posture an so on will affect which variant of the technique will suit us the most. This myriad of different idiosyncrasies, “customised” versions of each and every part of archer’s technique, becomes quite apparent when watching pro archers shoot: you see different stances, different preparation postures, different anchors – even the pace at which they execute the shot sequence.
Practising with a stretchy band will help you get used to feeling which muscles need to be activated
But despite the fact that many elements of the archer’s technique may be very different, the physics of the shot cycle remain universally unchanged. Think of archery technique as an accent in a language: every user has their own, unique way of pronouncing words while still retaining the basic functionality of a language as a communication tool. So will every archer shoot slightly differently and still be able to send the arrow, time after time, to its mark. The problem is that we tend to focus on those individual elements of technique so much that it’s easy to forget that they are there not to add to the general effort of the shot sequence, but rather to eliminate extra effort and to inject as much economy as possible into our technique.
The two things that form the foundation of all archery techniques are symmetry (that is, balance) and comfort. The former greatly affects the physics of the shot, the latter, concentration. And because comfort is the outcome of a solid balanced form, we should focus on symmetry.
Symmetry results from a combination of proper body alignment and even distribution of the linear forces which play a part in the entire shot sequence. Without it, consistency is not possible, or, at least, it is very difficult to maintain once your body has tired. Many archers who shoot only traditional bows (hunter recurves and flatbows) struggle with their shooting because they focus on individual aspects of the technique of the front end (that is, the bow arm), such as the grip or the elbow position; or the back end (the draw arm) such as the anchor point or the release.
Shooting a bow is all about learning how to relax your muscles, not how to flex them
Instead, they should focus on the overall symmetry of their frame. Why? Because it is thanks to the symmetry that you will be able to relax all the muscles that should not be engaged in the shot sequence.
Paradoxically, shooting a bow is all about learning how to relax your muscles, not how to flex them. So how should we go about it? Everything starts with just standing straight, arms relaxed and hanging down by your sides. If we take a look from the side at this basic stance we’ll notice several things: that our hands are always pretty much in line with the knees, that our arms are very slightly bent at the elbow (that is actually what we call a straight arm) and that if we now turn the head in the direction of the target, our dominant eye is in a perfect, or almost perfect, vertical line with the hand. This proves that no extra movements of either the bow arm or the head are necessary in order to align the bow arm with the line of sight.
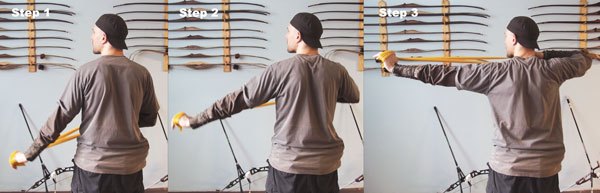
Now, if we raise both arms up, in a relaxed manner, so that wrists and elbows are in line with the shoulders, but paying very careful attention not to have the shoulders lift up, we’ll see that the shoulder blades will go around the spine and towards each other. With both arms relaxed – both wrists are relaxed, too – we can now flex the back muscles which will bring the scapulas together in a perfectly symmetrical manner.
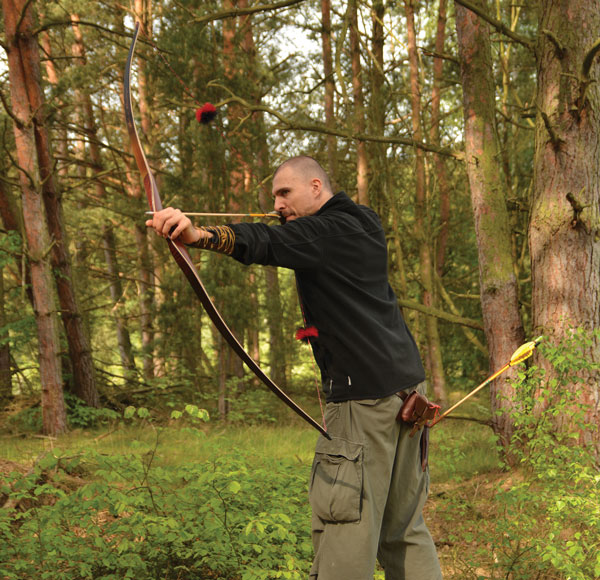
The aim is a balanced shot that feels comfortable and repeatable
We have now established the most important aspect of the form – we have connected the front end and the back end, thus assuring symmetry of the form. You should see that your spine is straight, both shoulders are pretty much at the same level as when the arms were hanging down and that both scapulas are mirror reflections of each other.
Why is this arm-raising exercise so important? Firstly, it allows you to start learning how it feels when particular muscle groups are relaxed. Secondly, it shows you that the bow arm, which is probably the most important aspect of the form, doesn’t need to be manipulated into the correct position, that is, the elbow position is that of a door hinge – vertical. And thirdly, if you now lift the palm of the bow hand up, you’ll realise that it, too, is already in the most natural and comfortable position with the lifeline being at a 40-ish degree angle.
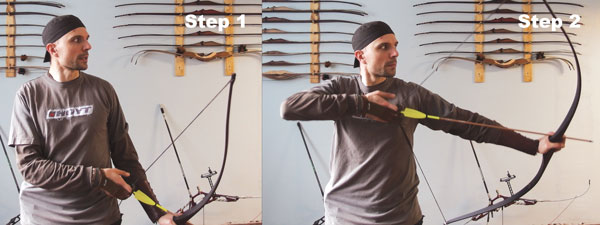
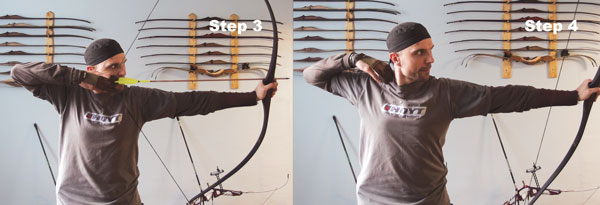
Thus, merely by raising our arms symmetrically, we’ve established how we’ll grip the bow and what the correct bow arm position will be. But what about the draw arm? How are we to maintain that symmetrical form if the other hand has to bend at the elbow in order to draw the string? Well, think of the entire motion not as pulling the string back but rather lifting both arms up and there will be no problem.
This type of swing draw is what seems to work very well with tall archers in particular. It is so because you do not have to reach out all the way to the string once the bow arm is up. Because your arms are longer, by doing so you’d have to rotate the draw arm shoulder forward, which would collapse the entire frame forward and it is going to be very difficult to get the shoulder blades to meet at full draw.
With the symmetrical swing draw we are totally in control of what the body is doing, and that will translate into more comfort during shooting and tighter groups in the target
With the symmetrical draw you basically raise both arms up, which results in the string being pulled back. It is very important to realise that it will never be a draw – a pull in the opposite direction from the target – but rather a simple raising of both arms up, not just vertically upwards but slightly towards the chest. Think of it as your two hands are only hooks; we should first start focusing on raising the elbows and then on just the right motion of the shoulder blades. This motion is best practiced with a light stretchy band so that the body can first learn which muscles are engaged and which are not. Only then should we take a bow and shoot a few arrows.
There should be no difference in what the back looks like when the exercise is done with a band or with a bow. Because of the shoulder joint’s structure, there will be absolutely no problem with arrow-draw forearm alignment if no unnecessary muscle tension was activated during the draw cycle. This alignment will be felt quite clearly, with the bow pressing hard into the bow hand by a force that goes along the arrow shaft and the draw arm forearm, to a point directly behind the elbow.
With that symmetry in place, and a minimum number of muscles engaged, we can now focus on all the other elements of the technique, because now any redundant tension can be easily spotted and eliminated. With the symmetrical swing draw we are totally in control of what the body is doing, and that will translate into more comfort during shooting and tighter groups in the target.
This article originally appeared in the issue 116 of Bow International magazine. For more great content like this, subscribe today at our secure online store www.myfavouritemagazines.co.uk
Hello there,
I am writing a few paragraphs to describe basics postioning and posture for archery, and I would like to have your permission to use one of the pictures, cited and credited, of course.
Most obliged.
Hello Douglas.
Please, feel free to use the pictures or you can contact me and I’ll be happy to help you out.
Regards
Bart