
Ashe Morgan looks at a few different ways to improve the most important part of your shot.
The release is the most important part of your recurve shot; consistency here will skyrocket your performance, and even minor errors can drop your score.
When I talk about the release I’m not referring to the action of the draw fingers alone. I’m talking about the movement of your whole body whilst the arrow is being launched from the bow.
This combines the “draw-side” release with the “bow-side” release and any other movements. You might have the best release since Park Sung-Hyun on one side of your shot, but collapse on the other half and you will be stuck with low scores forever. For now, I’ll focus on the key aspects of the draw-side release.
#1 – Improve your bow fitness
This is something of an elephant in the room. Let’s be honest, this is the simplest and most frequently ignored cause of a sloppy release.
A good release is simply not possible if you are overbowed. The end. Using an overly heavy bow will force you to use the wrong muscles (and the wrong technique) in a futile attempt to wrestle your body into position. What fun is it shooting like this? I’d save yourself the low scores and potential injury by switching to a suitable poundage.
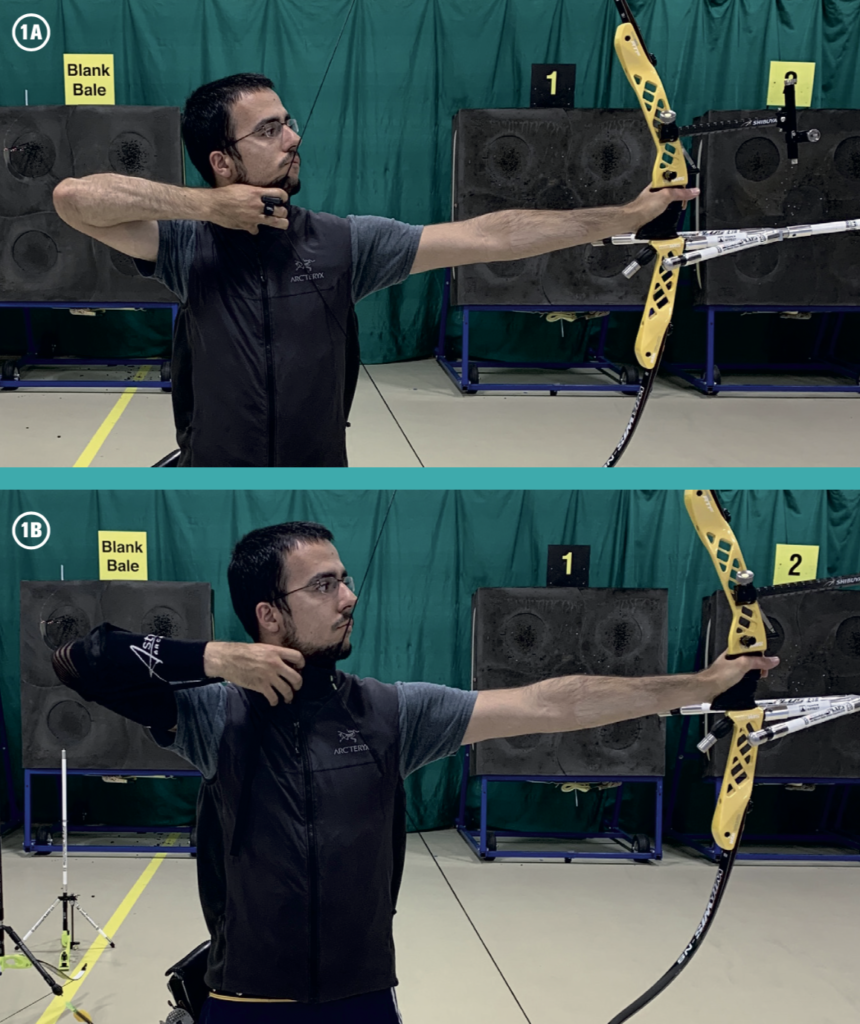
It’s also a bit of a truism, but any serious archer must also do a gym program and bow training of some sort – it’s that simple. Full draw holds are good to start with, and you can do these with your fingers (Fig. 1a) and with a Shot Trainer (Fig. 1b).
Using the Shot Trainer or other Formaster-like devices also helps you learn how to maintain the string connection (see below) as you lift the bow.
During any bow training, it’s hugely important to maintain form. Start with a band or light bow first and increase gradually, you will still benefit massively. Technique is king.
Now I’ve got that out of the way, let’s focus on the technical stuff!
#2 – Create the string connection
The way your fingers leave the string during your release is greatly affected by how you position them. However, the importance of the hook extends far beyond this simplification.
This part of your shot is one of only two permanent contact points with the bow, and your technique here affects how well you can connect the draw arm to the scapula. This then affects your ability to open the bow properly, get into alignment and expand smoothly through the clicker. As you can see, it’s kind of important.
The first piece of the puzzle is to understand the correct draw arm positioning. The best way to do this is to use an exercise I call the “Draw Arm Connection Drill”.
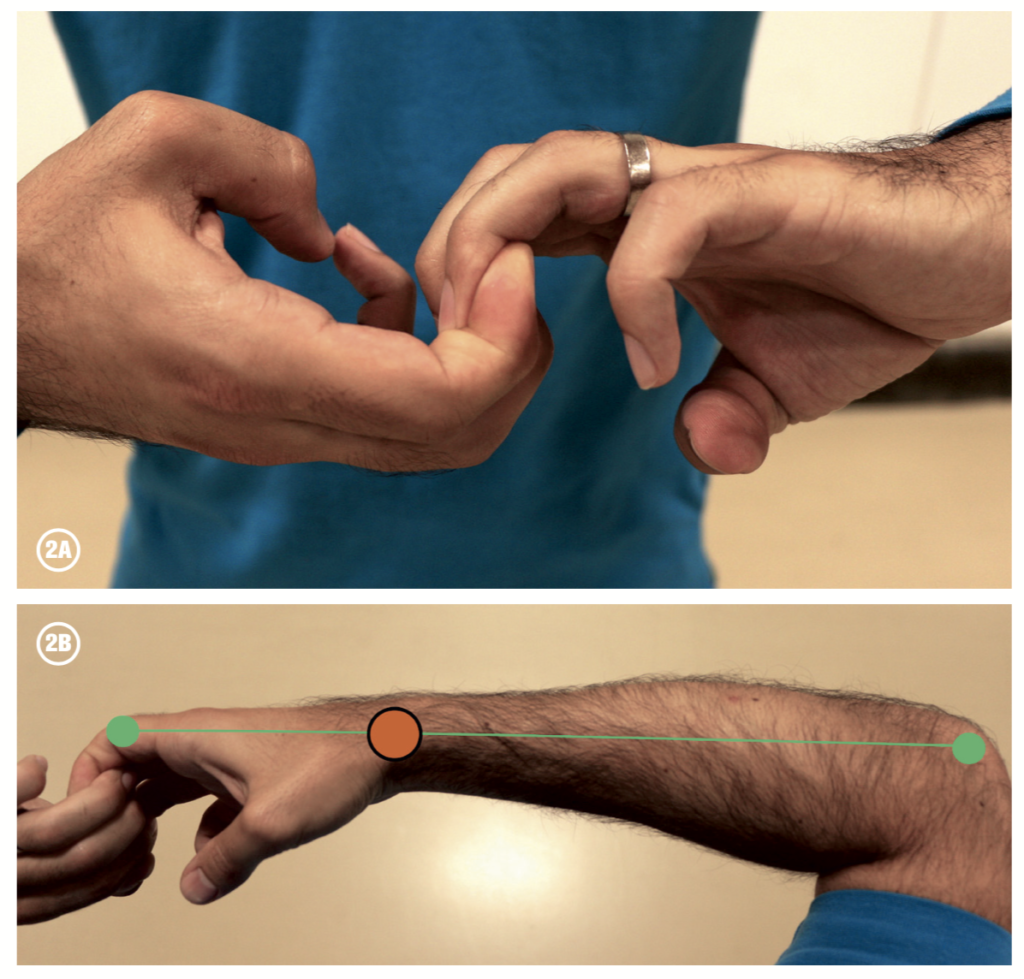
Place the first finger pads of your hooking fingers on each hand together (Fig. 2a), but don’t go deeper than the first finger joint. Then, simply bring your hands out in front of your chest so that you can look down at them easily.
First, pay attention to the shape of the fingers and hand. Excessive tension should be avoided here, so the back of your hand shouldn’t look and feel as if you’re gripping on for dear life. If you feel like this, allow the fingertips to open very slightly to help you get a more relaxed position.
Next, look at the wrist and forearm angle. You should be able to form a straight line starting from your fingers, going through your wrist and forearm and connecting to your elbow (Fig 2b, green line). The wrist should be neutral or slightly past this line, but not over exaggerated (Fig 2b, orange circle).
Crucially, it should feel like your elbow and hook are connected and functioning as one unit. Try applying more pressure through your hook fingers; you should feel like you are directing the movement from your draw elbow, and you should also feel a connection to the lower part of your draw scapula.
Applying this to your shooting is simple: you must create this connection during your set position on every single shot. Practice this with a light bow before moving to your normal bow at 30m or closer.
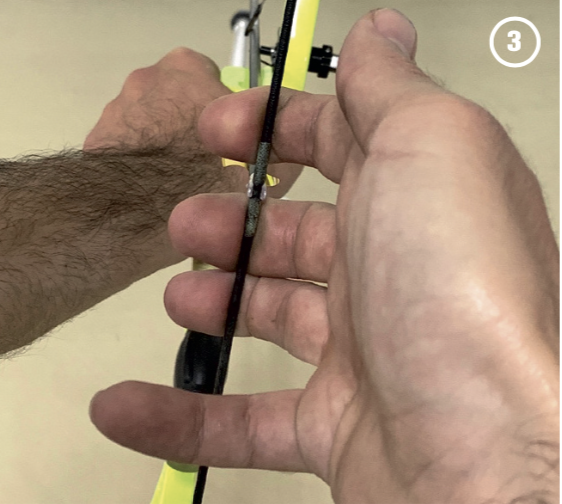
For the hook, you should place the string in the groove of the top and middle finger and slightly in front of the groove on the bottom finger (Fig. 3).
To improve your release, you must maintain the connection between the hook, elbow and scapula through your whole shot.
#3 – Forget about back tension
To create a good release it’s essential to have continuous movement through your expansion. The core issue with advising archers to think about back tension is a fundamental one: it is least effective for those archers that struggle the most with their release.
Instead of thinking of tension, think about movement. Kim Woojin, one of the all-time greatest Korean recurve men, when asked about the recurve release, said: “It’s all in the movement of the shoulders”.
Your body understands movement much more naturally than tension. When you do a bicep curl with a weight, do you think about contracting your biceps and relaxing your triceps? Or do you just think about moving the hand closer to the shoulder? The answer is obvious.
The reason back tension can be destructive is because it’s so easy to misunderstand. Most archers lose their movement when they feel like they are using back tension.
They feel as if they are squeezing the shot through the clicker, but they are normally just overly tensing the upper traps and neck. This is exactly the opposite of what we want. It leads to fatigue, inconsistency, and a sloppy release. And it makes you more injury-prone.
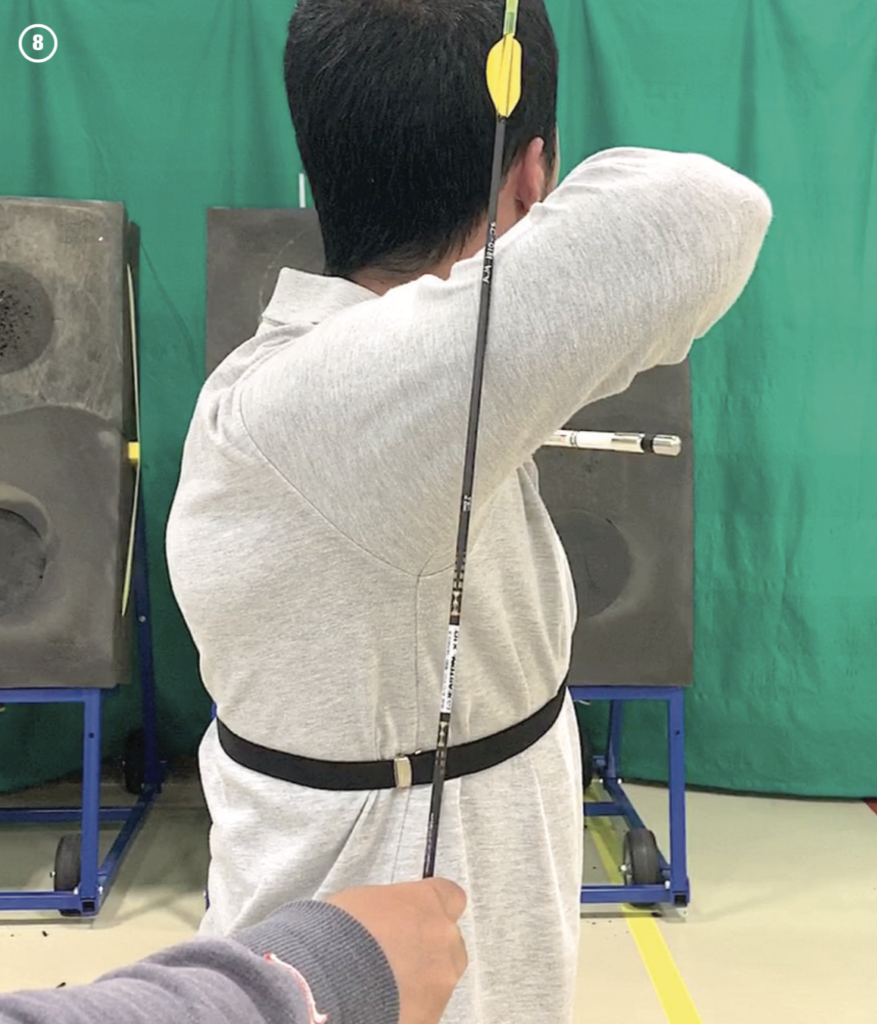
A great way to think about movement instead is by doing the Elbow Direction Drill in Fig 8. As you’re coming into your anchor position, get a friend or coach to lightly push an arrow against the back of your elbow. Focus on pushing against this arrow through the rest of your shot, whilst maintaining a feeling of space around the shoulder joint and neck. This will encourage the correct use of your back.
I’m not saying that thinking about back tension is wrong, but it’s a much more advanced skill. To continue our gym analogy, an advanced bodybuilder might benefit from focussing on specific muscles, because they fully understand the basic movements.
Also, you definitely do want to use the large muscles of the back; they are among the strongest in your body and using them is essential to correct technique. But there is a key difference between the normal muscle engagement needed to move your shoulders and shoot, and exaggerated muscle tension that harms your shot.
This is why I prefer to think in terms of using the back muscles rather than creating tension.
Only once you have good alignment, shoulder movement, and the skill to keep expanding through the shot should you start thinking about back tension. That way you can be sure you are using it properly.
#4 – Teach the body how to release
The recurve release is not a skill that people develop in day to day life and the key to learning it is to teach yourself properly. Trying to learn the release by just picking up a bow and shooting is slow and haphazard.
Imagine attempting to hit a golf ball without first learning how to grip the club or swing properly. Madness.

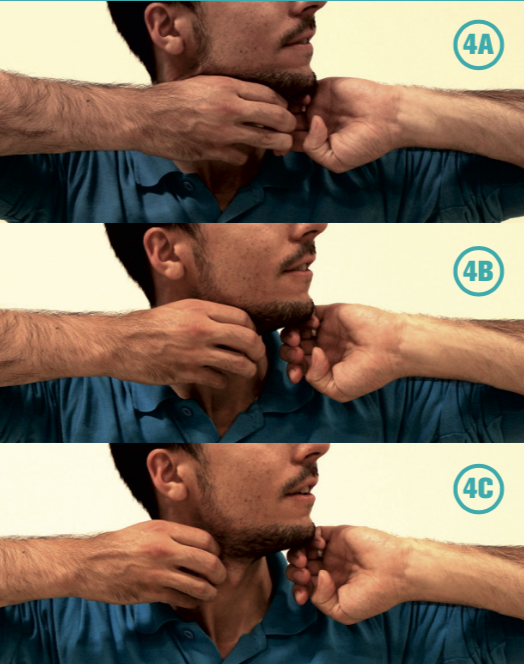
There are lots of great drills that can quickly improve your release and teach you the correct motion and feeling. One such example is the Finger Release Drill (Figs. 4 A,B and C), which teaches you to avoid deliberately opening the fingers.
To do this, hook your hands together and position them at your anchor position, then increase the pressure quite strongly whilst keeping your hook. Finally, quickly allow the fingers to slip away, creating a snappy, short release.
The Release Follow Through Drill (Fig 5) is great to prevent the draw hand flying out as you release. You simply bring the hand to your anchor position and slowly move it back whilst keeping the fingers touching the neck at all times.
It should feel as if you are almost scratching your neck. You should lead this movement from the draw elbow and you should feel the elbow moving around the body.
This is a great way to teach your body the correct hand, arm and shoulder movement and also improve your flexibility.
#5 – Improve alignment
This is a key ingredient to a great release that is, for some very bizarre reason, normally ignored. Your alignment can be understood best when viewed from above (Fig 6a/b). The left image shows good alignment, and the right shows poor alignment.
The impact this will have on the release is huge. If you are in line, the forces of the bow line up with your bone structure, which means you don’t need to use much muscle tension to hold the bow or expand through the clicker. As a result, your expansion will be stable and you can continue your movement more easily. This will result in a clean release that stays close to the neck.
If you are out of line (Fig 6b), the force of the bow will constantly try to collapse you during the shot. It will be hard to expand in the right direction and you will probably have lost the string connection you worked so hard for earlier.
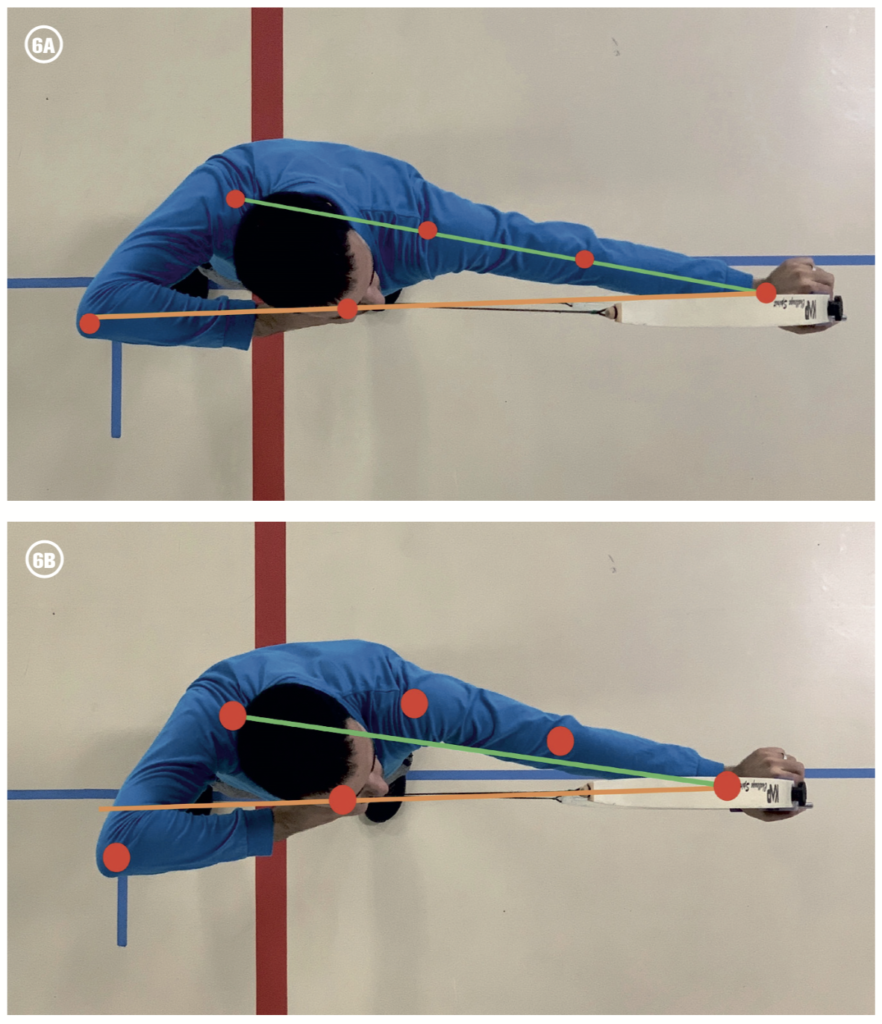
Rather than allowing the fingers to be pushed out of the way, you will probably open them to release the string. The net result: a softer, more outward release.
In Fig 6b, notice how far away the draw elbow is from in alignment. Getting it closer to the line of the arrow (Fig 6a) will make a dramatic difference to your release. Some people argue that they simply can’t achieve this, and I used to be one of those people. But this is just an excuse. Almost everyone can get into alignment with hard work and perseverance. And your release will thank you for it.
To work on your alignment, do draw ups with a band or light bow and use feedback. Trying it with your bow straight away is unlikely to be useful and could lead to injury. Ideally, overhead video feedback is the best, but facing into a mirror is also good. Getting the dots as close to the two straight lines (as shown in Fig 6a) is what you want to focus on achieving.
It’s important to maintain your posture too, as losing this will compromise your shoulder movement.
#6 – Get to ‘real’ full draw
An archer may appear to be at full draw by opening the bow and bringing their hand to the neck. However, this is not ‘real’ full draw; it’s simply coming to your anchor position. Real full draw is achieved when you move fully into alignment and feel the force of the bow through your bone structure and shoulders.
It differs from general shoulder alignment in that it is best described as a feeling, rather than an absolute position. Achieving good alignment feels like you are in a strong position, whereas getting to real full draw feels like you’ve fully braced yourself inside the bow and are ready to explode into your release. It is not a feeling of tension in any way, but more a feeling of being in the right position to finish your shot and release confidently.
Reaching real full draw is much more likely if you have good shoulder alignment and have your draw elbow behind the arrow line, but there’s more to it than that.
You need to find a repeatable movement or sensation to bring yourself from anchor to real full draw. Focussing on moving the draw elbow around the body is an example of a motion that works for many archers.
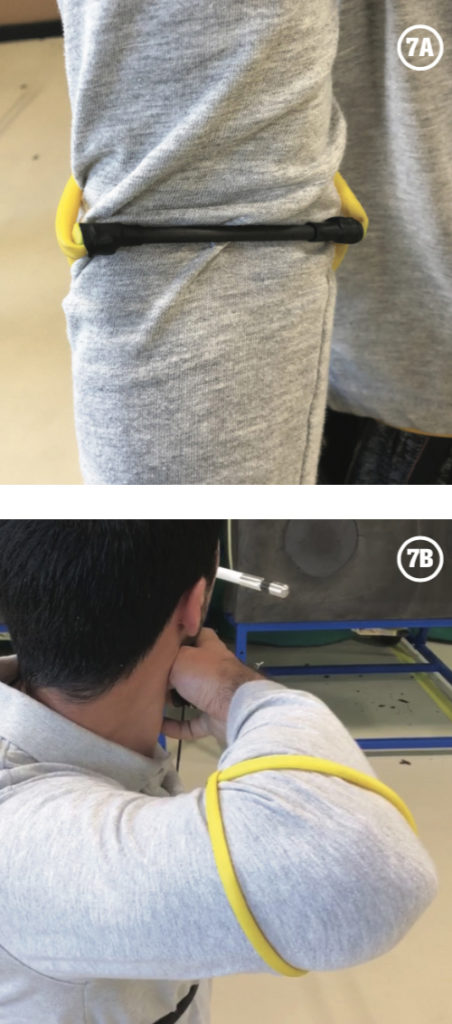
Using an “Arrow In Elbow” expansion trainer device (Figs 7a and 7b) – which places your focus on squeezing the arrow between your upper and lower arm – this will also provides great feedback to teach you about reaching real full draw. This is used by young Korean archers in training.
When done correctly, a great release transforms your shot into a dynamic movement that is aggressive, yet elegant. It’s a beautiful skill that can take an incredible amount of work to develop, but there are ways to fast-track your progress.
I’ll also let you in on a secret: every stage of the shot is only there to maximise your chances of executing a clean release. But let’s keep that between us!
Ashe Morgan is a founder of onlinearcheryacademy.com
Top
just read, Six ways to improve your recurve release, Feb 10, 2020.
#4 – Teach the body how to release.
“The Release Follow Through Drill (Fig 5) is great to prevent…”
What is Fig 5, I don’t see it.