
The method that I teach people to shoot is a development of a method I was taught when I first joined an archery club and learned to shoot in the 1960s. This shooting method was used to great effect by one of England’s longest- standing and most consistent members of the international archery squad, Roy Mathews, who by 1974 had represented the country over 21 times.
 At this time, the standard of archery was generally quite good but Roy observed that people were starting to chase scores at the expense of the quality of their shooting. The slow increase in scores was entirely due to the improvements in equipment, which were starting to mask an underlying poor technique. It is this poor basic technique that is responsible for many people starting to score reasonably well fairly quickly but then struggling to improve.
It is unfortunately a frustrating fact that too many people come into archery looking for instant success. If they don’t achieve it, and then go out and buy the very best equipment and do not do any better, they leave the sport.
In any martial art, and archery must be one of the oldest, you need to take the time to teach the body how to master the fine movements and muscle control that will enable us to optimise our ability. As archers, we are using muscles in ways that are different to the way these muscles are used in everyday life. So if you are going to master shooting the bow you will need to allow your muscles time to develop.
The development of muscles takes time, as does getting used to using the muscle groups in different ways. All of this is best done initially with a relatively light bow, progressively increasing the draw weight of the bow as your muscle tone develops and you gain more experience and control.
If you want to become a seriously good archer then you need to start out with a plan. If you plan how you are going to succeed you are likely to do reasonably well, and while your plan might need to be extended a little and developed as you go along, it should work. You should be looking at a five-year timescale.
I have customers coming to me who want me to build them a bow that will give them an edge at 100 yards – because they want to achieve something specific.
Some of these people are in their first and second year in the sport. We can build bows for this purpose but, in my opinion, their expectations of their ability are well beyond their current shooting level. While they have developed a method of shooting, sometimes with the help of a target archery coach, they have not yet learned how to get the best out of a simple wooden bow, and there is much about their technique that is not yet properly developed.
The frustration is that everyone seems to want instant success, but if winning is that easy then it is probably not worth it when you get there. There are always going to be people with more experience, better technique and the patience who have taken the time to hone their skills, and these people are not easily beaten. Roy Mathews commented that the competition was with yourself, “to be the best you that you can be.” In time, and with practice, ‘the best you’ becomes a better archer than the best of the rest.
So if your ambition is to achieve great things you have to start at the bottom, and keep it simple. In these articles I will try to give you an overview of the best way to master the English longbow. This method is the one I have developed over 35 years or more of coaching and with an intimate knowledge of how longbows work.
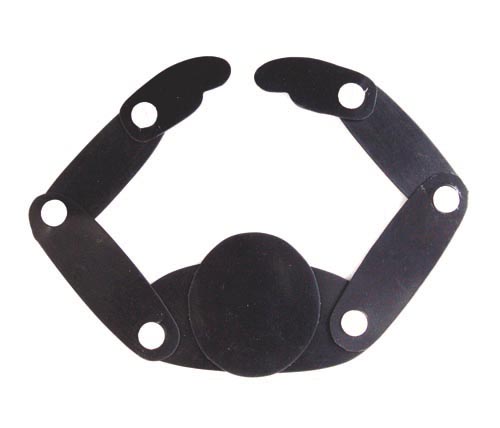
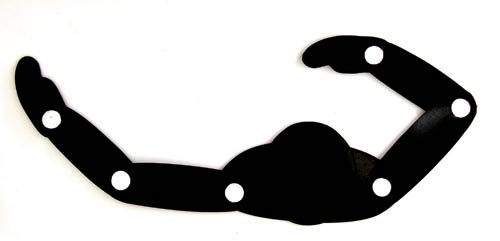
These diagrams illustrate a set of exercises that will enable you to exercise the correct muscle groups that will help in drawing the bow. One of the most important aspects is that when you are familiar with an exercise and a set of muscle movements then it will feel right when you are doing it right.
Initially when we show people how to draw the bow they are very likely to comment that it ‘feels’ wrong, because it is a new and unfamiliar movement. You do not normally hold your body in that position – because why would you?
So once you have accepted that it will not necessarily feel right, then you will need to do the necessary exercises that will help it to feel right. In doing so you will start to develop some muscle tone in the muscles you are going to be using when you shooting the bow.
With these diagrams you need to imagine you are seeing a person from vertically above and that the white dots are hinges where the arms and shoulders bend. To get yourself into the starting position stick your arms out to the sides, with your palms vertical and your elbows positioned, as in the diagrams, as if you had vertical hinge pins in the elbows. You can then fold the arms in and across the body bending both elbows and the shoulders.
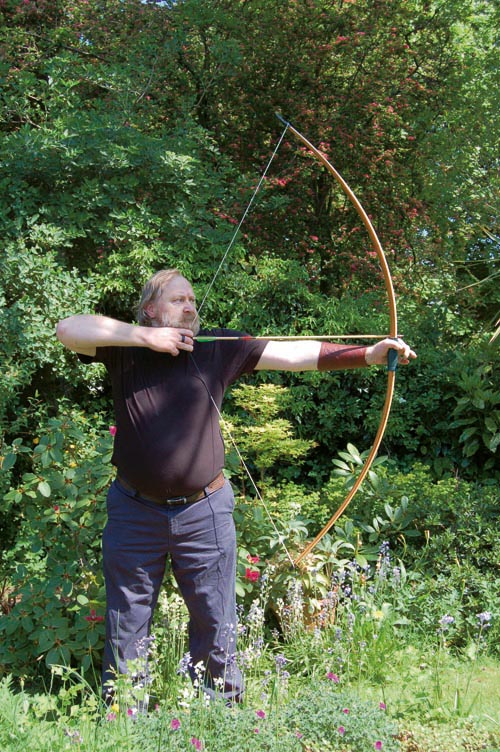
When drawing the bow the shoulder muscle groups are used more than those in your arms, but if you are going to be able to use the shoulders properly you have to do two things. Firstly, the shoulder muscles work best when both shoulders are in use so when drawing the bow you need to use a lot of upper body movement that will use both shoulders.
Secondly, you need to make sure the elbows are bent in the way they are shown in the diagram; with the bow arm the elbow needs to start off bent as you start the draw and it needs to be slowly straightened as the shoulder rotates but it should never be allowed to lock straight.
If your bow arm does over-straighten three things can happen. Firstly, you are likely to hit your bracer with the string. Secondly even if you do not hit your bracer, the stiff arm will move to the left (for a right-handed archer) as you loose the arrow and your arrow will go left. Some might say your arrows are too stiff, and try to cure a fundamental fault in your technique by changing the equipment. Thirdly, you will not manage to get the best performance from the bow. A slight bend in the elbow will mean that as you loose the arrow your bow arm will extend forwards towards the target at the same time as the string is pushing the arrow towards the target. This means that the energy from the bow and the extension of the arm are in the same direction, so the arrow will fly true and no energy is being wasted for a fast and accurate shot.
The shoulders are rotated such that the elbows move in the direction of the arrow. If you repeat the movement at least 10 or 12 times you will find that you have encouraged blood flow in the muscles you will soon be using to draw the bow. This is a good way to warm up the body before you begin shooting. This exercise will also help to develop the ‘feel’ in the muscles that is so important when shooting.
 In the diagram you can see the start of the draw. The elbows will move back by rotating the shoulders. The bow hand (in this case left hand for a right-handed archer) is pushed forwards towards the target. The string hand is effectively pulled back by the elbow and shoulder movement. There should only be enough tension in the right forearm to enable the fingers to pull the string, with the forearm and wrist acting as simple links in a chain connected to the elbow.
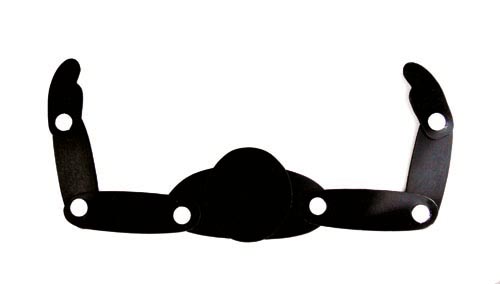
As the draw progresses, the string hand will get closer to the anchor point on the face but the bow arm elbow should remain slightly bent, even at full draw. The shoulders are now taking most of the strain and the arms are starting to push and pull towards the line of the shot.
As the bow arm slowly straightens, the bow hand is steadily pushing towards the line of the shot and the string hand comes towards the anchor point pulling more into the line of the shot.
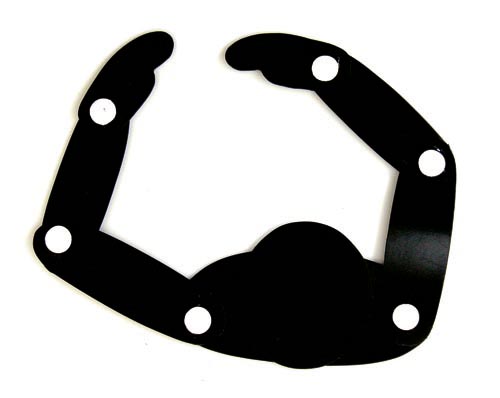
The line of the shot is also the direction that the bow arm is pushing. It is vital that the elbow does not lock out but remains in tension pushing towards the target. The string hand should be firmly registered on the anchor point and be steadily pulled, by the elbow, into the line of the shot. At full draw, as the diagram shows, the shoulders should be at a slightly angle to the line of the shot. This position gives significantly great control than if the shoulders were completely in line with the shot.
It is quite usual for people to be taught to stand with their feet shoulder-width apart in line with the line of the shot. This is actually a very bad idea. If you stand up straight with your feet shoulder-width apart with your shoulders the same as the line of the shot, then your body will tend to be least stable front-to-back across the line of the shot. This means you can ‘rock’ back and forth across the line of the shot. By angling the feet, the body and the shoulders, you will find you are more stable and less likely to rock back and forth at full draw.
You will also find that by not trying to draw the arrow too far, you are much more in control of the shot, and you will find that you can therefore shoot more consistently. You have a natural draw length, so don’t try to draw any further than is comfortable.
If you angle the feet slightly more than the shoulders, in a right-handed archer’s case that would mean moving the right foot slightly forward of the right shoulder, this will also give slightly greater stability in your stance.
Clearly these are general guidelines to go with the generic basic shooting technique. In target and clout archery it is relatively easy to apply these guidelines. In field archery the stance and shooting position might easily vary from one target to the next and we can look at this in more detail elsewhere. As a general rule, you should always look for a comfortable and stable shooting position as this will help you to shoot consistently whatever situation you might find yourself in.
As a newcomer with a longbow my arrows were always flying to the left so fellow members advised me to use the knuckles of my bow hand as a reference sight point which meant the point of my arrow was way to the right and pointing at the sky.After reading here that this problem is caused by locking the bow arm straight as I do with my recurve I went over to the target field and bent my bow arm as described, put the point of the arrow on the target and wow I can now hit the target(at 50 yds with 40lb bow)
Thanks for posting this! I am a total novice (haven’t shot since high school, and then only did it at summer camps). These are some great exercises.
I find that my left/right accuracy is pretty good. But my vertical accuracy varies greatly. I have tried using a rubber band but I cannot see it when I shoot with both eyes open! I have tried using the arrow point but even at 20 yards I cannot get the point low enough (in my opinion). I was wondering if I am holding my bow too high – I use it at the same height as my recurve.
Great article by the way.