
It’s always been my opinion that one of the most important components to the compound archer is the mechanical release aid. This is the one part of your archery arsenal that certainly needs to be precise and trouble-free. There is a zero- tolerance policy in my book when it comes to this. I speak from experience when I say that an improperly used or maintained release can quickly ruin any positive results at a competition, and in worst cases an archer’s entire career. In this article I’ll go through some easy steps to make sure you are holding your handheld release properly, and what to do so that your shots take less effort.
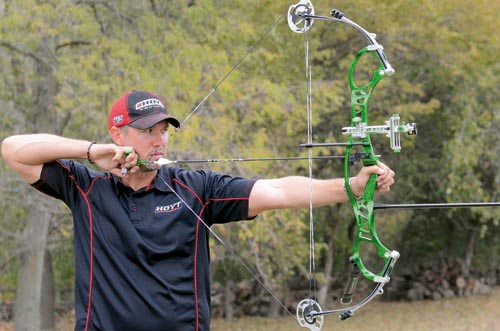
In my last article I talked about picking a release and really learning to master it. This is a very important tip and one you will need to analyse more than you thought was possible. If you are at the point where you are trying to bring in those two or three points a match that keep you from reaching your goals then the release hand may very well be the place to focus. Think of it like this, how your hand holds and moves your release aid is much like how a recurve archer’s fingers hold and control their string. Although a release aid is much more forgiving than fingers, there is still room for errors and inconsistencies that will affect the arrow upon your release. What I like to do is break down the release connection into three parts.
The first part is going to be the set up. This is how you set up your hand to hold the release. It is critical that you hold it the same every time to get repeatable results. A handheld release should always rest between the two bends in the fingers. When you place the release in this row of knuckles it allows you to keep the back of your hand flat. This is important because a flat hand allows you to anchor properly on the face and keeps the string close to your face as well. Because the string is aligned close to the face it allows you to look through the peep sight without having to turn your head outward towards the string. Keeping your head straight is much easier to repeat and a lot less likely to interfere with the string. As you can see, there is a lot of cause and effect going on here.

 A common mistake a lot of people make is grabbing the release aid and getting it too deep into their hand. When you do this it creates more of a fist around the release. Having a balled-up hand will create most of the problems that I just mentioned in the last paragraph. Another negative result is inconsistency in length. Try bending your fingers closed while keeping the back of your hand flat – do this several times. You will notice if you keep your hand flat, your knuckles close at the same length every time. Now try the same exercise but allow your hand to bend as if you are making a fist. You will notice that when you make a fist you can easily change the position of the knuckles of the fingers. This will ultimately affect your draw length and how you feel at full draw. The reality is that most people clench a fist tighter the more pressure there is on them, so in a tournament you will find it much easier to repeat a flat hand with curled fingers than a closed, rounded hand.
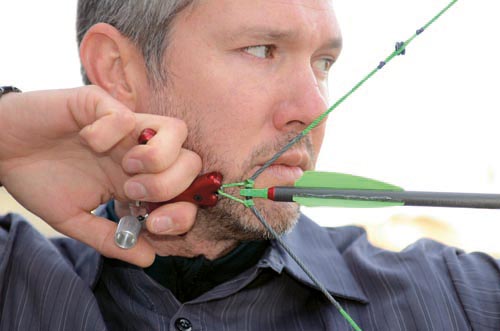
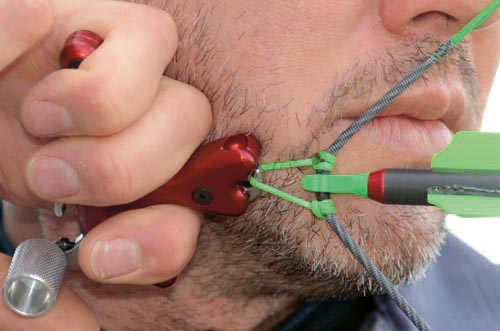
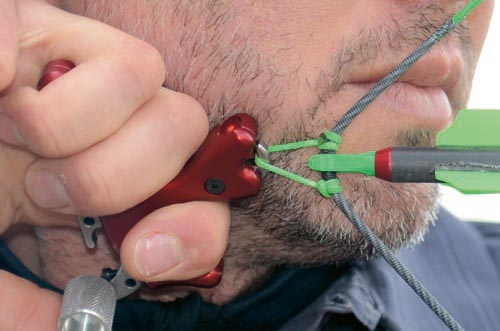
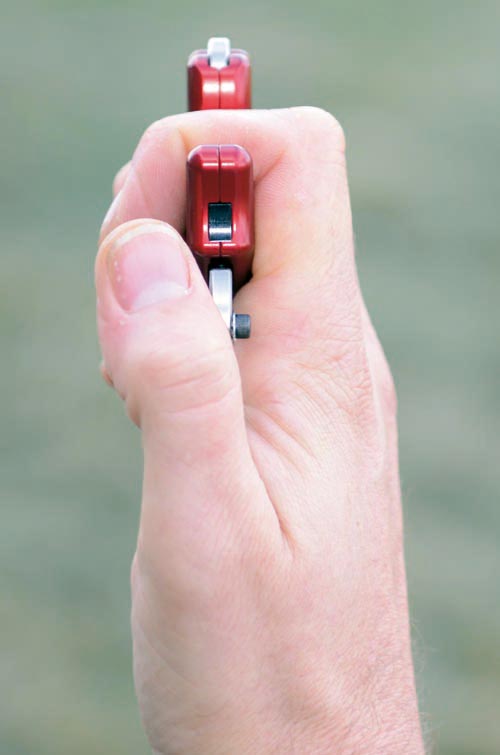
The second part for you to focus on is what I call the ‘rocking horse’. This is what I refer to as the rocking position of the release aid. This is determined by the pressures of the fingers on either end of the release aid. Take a look at the two photos . You will notice that in one photo the release aid is laid forward and in the other it is laid back. This is a result of the pressure differences on the fingers on both ends of the release. What is important about this is that these differences affect where the d-loop will rest in the jaw of the release. This can give a variance in the string path once the release is fired. It can also cause ‘hangfires’ in lower quality release aids. The importance of the rocking horse is recognising it and making sure that when you come to your anchor position you make a conscious effort to make sure you are doing it the same all the time.
I prefer to favour a rocking position that is natural to the ergonomics of the hand. I like the pinky finger and ring finger closed and touching the palm. The index and middle finger should be just slightly more relaxed. This position also rocks the trigger position closer to the end of the thumb when it is straight. There are many people who rock their hands in exactly the opposite direction, with the index finger being the tightest and the pinky being the loosest. I personally don’t favour that unless you are using a hinge release, and not a trigger. My biggest problem with the index finger being so tight is that it rocks the trigger of the release deep into the thumb joint, and I have seen numerous bad habits develop from that position.
The last part is what I call the pre-load. The pre-load is the engaging of the thumb to the trigger itself. This is an important step because many people fail to understand that the pre- load often determines the speed and rhythm of their shooting. If you are inconsistent in your pre-load engagement then the timing of your shots will also be inconsistent, and this will quickly promote impatience with the release. Impatience quickly leads to anxiety, which is a mild way of saying target panic and punching the trigger. One common mistake people make is curling the finger too much around a trigger. I believe the more contact you have with the trigger, the more sensory nerves you are allowing to feel every bit of pressure you are applying to it. For many people this will lead to wanting to anticipate the shot.
What I have found to be a better technique for preloading the release is keeping the thumb straight while bringing it to the trigger. Once there is just a touch of pressure between the thumb and trigger you can actually keep the thumb in the same exact position, and then focus on using your back muscles to pull the elbow back towards the wall behind you. If your release aid is set correctly you should be able to get your release to fire with this motion, without knowing it is going to go off. By reducing the amount of finger contact on the trigger, in addition to reducing the amount of finger muscle used, you will notice that the break of the release will happen with what feels like less effort. This is also due to the fact that the muscles in the back are much larger than the ones in the fingers, so the pressure you change by focusing on the elbow moving backwards is at a greater rate than it would be if you focused on the fingers.
 Good time to dry fire
Now that I have pointed out a few things to work on, it will be really important to put them to use. A useful practice technique is dry firing with a long cord set to your approximate draw length. This simple string routine will allow you to really focus on these three critical parts of the release. I think when learning new things you are better off eliminating other elements from the equation. This technique is one that I used to do at work while I was on the phone (I used a headset). What this did was help my shots feel super-consistent, effortless and much faster than in the past. It is an easy way to build a habit of setting up on the release correctly, rocking it to the right position and finally mastering the pre-load for a quick shot execution.
It is important that you are sure to tie off a piece of string that is consistent with your draw length so that your posture and pull can be simulated. I want you to load the release on the string and lay it in your release hand. Curl your finger around the release and be sure to keep the back of the hand flat. Then extend yourself into a full draw position and bring your release hand to your normal anchor position. Focus on the rocking horse and adjust your fingers so that you find the right angle for your liking. Think hard on this position and really focus on what the pressures feel like on every one of your fingers. Once you are happy then move your thumb onto the trigger and give it a little pre-load. Pay attention to whether your thumb is bent, and the exact place on your thumb where you feel contact. Once you are certain you are in good form then maintain your pre-load pressure on the trigger and use your back to pull against the string. Make a conscious effort of pulling your elbow back to an object or the wall behind you.
What I really like about teaching these techniques during this time of the year is that it’s a perfect time to put it to use. Many of us are not able to shoot outdoors right now and many of us that do have indoor shooting as an option are limited on time there. This is something you can put to use anytime and anywhere. Your release hand is one of the most important things to determine the flight path of your arrow. Your release hand also plays an important part on your nerves during competition. These steps will help you feel less movement and will give you less anxiety. It will make your shots go in less time with a lot less effort. Focus, young grasshopper, and you will soon learn to master the release.
Great article thanks for the tips. I will be using your reccomendations. Luc…
I am curious as well as enthusiastic about what you are currently talking about right here.
Awesome article!! Thanks for sharing this!! Very informative on the proper usage of a release aid!! Thanks!!
I will be intrigued as well as enthusiastic about what you’re covering here.
You could certainly see your enthusiasm in the work you write. The world hopes for more passionate writers like you who are not afraid to say how they believe. Always follow your heart.
Mastering the release aid | Bow International [url=http://www.idfresearch.org/tomsshoesoutlet.html]toms outlet[/url] toms outlet
After 45 years of shooting Fita with recurve I switched over to compound and release because of torn shoulder, also switched from left to right hand.I’ve been shooting for a year now and had to search everything out there on proper technique for a release, but this is the most informative article I have ever read, thank you!
after a 6 yr layoff, one forgets these finer points. good to see it in writing, it brings back the right way, thanks and it is good to be back shooting again.
I am sure you can’t imagine, but this article has helped me learn the proper release procedures as has brought my scores in 3D tournaments to an all time high. Thank you John Dudley and Bow International.
Thanks for the information partner it is was helpful to me if you can,can you put something on back tension release’s.Thank you for your time.
I read this paragraph completely about the difference of
latest and earlier technologies, it’s remarkable article.
This is one of the best articles online for top tips on using a release aid! I learned a great deal and corrected numerous bad habits.
This is great advice for hunters too!
Awesome writing keep writing for the good of compound shooting take care